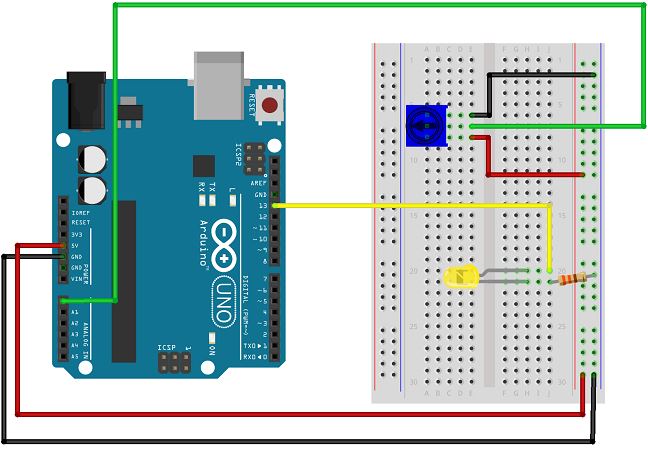
int sensorPin = 0; // Potentiometer connected to analog pin 0
int ledPin = 13; // LED connected to digital pin 13
void setup () // This function runs once at the beginning of the code
{
pinMode (ledPin, OUTPUT); // We will use pin 13 to turn on the LED, so we need to configure it as an output.
}
void loop () // This function runs continuously after setup () is completed
{
int sensorValue; // First, declare another integer variable to store the value of the potentiometer
// Arduino can read external voltages on analog input pins using a built-in function called analogRead (). This function takes an input value (the sensorPin we set to 0 earlier), and returns an integer value ranging from 0 (0 Volt) to 1023 (5 Volt).
sensorValue = analogRead (sensorPin);
// Now, we will blink the LED, but use the sensorValue variable to change the blinking speed (the smaller the number, the faster it blinks).
digitalWrite (ledPin, HIGH); // Turn on the LED
delay(sensorValue); // Pause for sensorValue milliseconds
digitalWrite (ledPin, LOW); // Turn off the LED
delay(sensorValue); // Pause for sensorValue milliseconds
// loop () repeats indefinitely.
}
int sensorValue;
A "variable" is a placeholder for values that can change in your code. Before using variables, you need to declare or "declare" them; here we are defining a variable named sensorValue of type "int" (integer). Note that variable names are case-sensitive!
sensorValue = analogRead (sensorPin);
We use analogRead () to read the value on the analog pin. analogRead () takes one parameter, the analog pin you want to use ("sensorPin"), and returns a number ("sensorValue") ranging from 0 (0 volts) to 1023 (5 volts).
delay(sensorValue);
Microcontrollers are very fast, they can execute thousands of lines of code per second. To be able to see what it's doing, we often add delays to the code. delay () is measured in milliseconds; There are 1000 ms in one second.
After running the code, you should see the LED blinking faster or slower depending on your potentiometer. If it doesn't work, make sure you've mounted the circuit correctly and verified and uploaded the code to the board.


.png)