When it comes to making a power bank, some of us may think it's a difficult task, in this blog post, we will explain how to make your own power bank circuit quite easily. We have compiled everything you need for this project, which can be done at a very low cost compared to the products available in the market, including the materials needed, such as the Arduino codes, connection diagram, etc. Let's take a look at everything that comes to mind when it comes to making a power bank.
Very few materials are needed for making a power bank. The first material we need is a power bank circuit. There are various types of these circuits. These circuits are used by connecting Li-ion batteries. The capacity and quantity of the battery you choose will determine the charging capacity. You can find detailed information about battery selection in the continuation of the article. The required materials are as follows;
These are the only materials required.
As mentioned earlier, there are various types of materials to choose from. The main thing to consider when selecting a circuit is the current value. For example, you can use a circuit that provides 5V 1A output, or you can prefer a product that provides 2.1A output. These output values will change the charging speed of your phone. Charging will be slower with 1A, and faster with 2A. Another point is fast charging capability. If your phone supports fast charging protocol, you can choose a power bank circuit that supports it. This way, you can achieve much faster charging.
The most important point when it comes to making a power bank is battery selection. The mAh values are written on the Li-ion batteries. These values indicate the capacity of the batteries. The higher the mAh value, the longer the charging time. To increase this value, multiple batteries are often used. For example, if you have a phone with a 5000 mAh battery, you will need a 10000 mAh capacity power bank to charge this phone twice. You cannot find a 10000 mAh Li-ion battery, so it would be logical to use 4 batteries with 2500 mAh or 5 batteries with 2000 mAh.
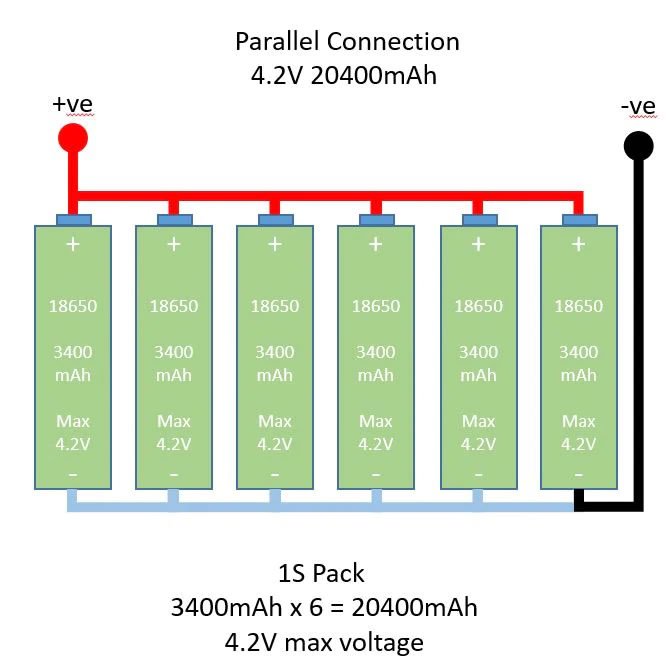
Since the capacities of the batteries are insufficient on their own, multiple batteries must be used. These batteries must be connected to each other in parallel. This point is very important. Batteries are connected in two ways, serial and parallel, depending on how they are connected to each other. In series connection, the voltage increases, while in parallel connection, the current value increases. There is an example of a parallel connection in the image above. The positive terminals are common, and the negative terminals are connected in common. If this connection seems complicated, you can use a parallel battery holder directly.
Now that we have the necessary information for making a power bank, let's see how to make our connection.
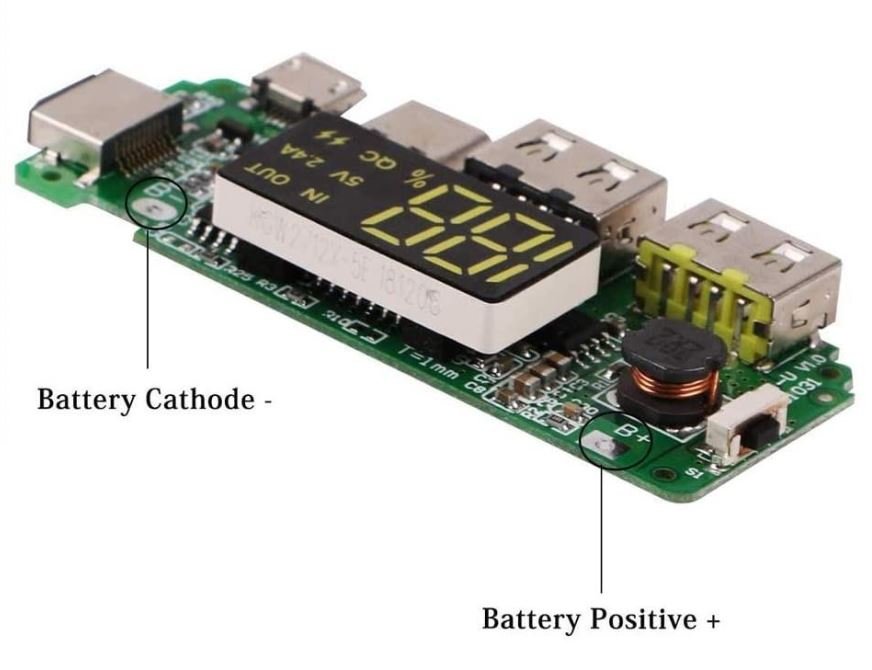
All we have to do is solder the batteries connected in parallel to the relevant terminals on the power bank circuit from the positive and negative terminals. Although the connection may vary from circuit to circuit, these connection points are indicated as P+ P- or B+ B- or V+ V-. Pay attention to soldering the positive and negative terminals to the correct locations. After soldering, our power bank circuit is ready for use.
Stay tuned to Motorobit for similar content and affordable products.


.png)