.png)
Temperature Controlled Fan Making | Fan Control Using Arduino and TMP36

Temperature-controlled fan construction is one of the coolest projects you can do with Arduino. Especially on hot summer days, you'll understand what we mean. :) In our blog post, we'll share the necessary materials, connection diagram, and Arduino code.
Materials for Temperature-Controlled Fan Construction
You can reach the purchasing pages by clicking on the names of the materials listed above.
We prefer TMP36 for temperature measurement in our project. This sensor is low-power and provides precise measurements in Celsius. We used LEDs and a buzzer to enhance the project and add different features. However, you can still successfully complete the project even if you choose not to include these optional components. It's entirely up to you.
Connection Diagram
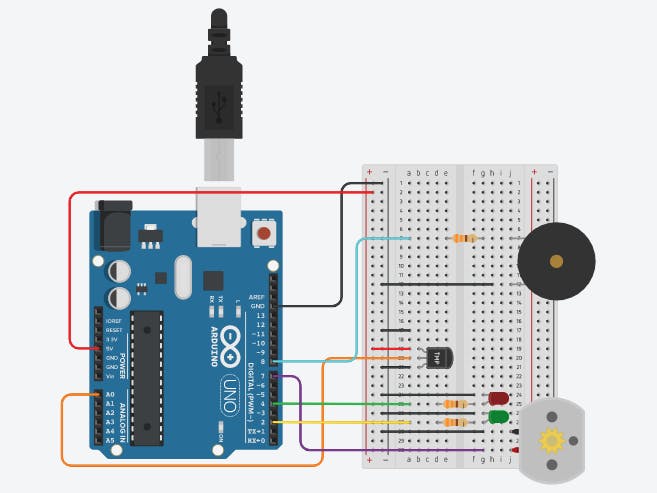
Arduino Pin (A0) -------> TMP36 Temperature Sensor (Vout)
Arduino Pin (2) --------> Green LED (Positive Pin)
Arduino Pin (4) --------> Red LED (Positive Pin)
Arduino Pin (7) --------> Fan Positive Terminal
Arduino Pin (8) --------> Buzzer Positive Pin
We make our connections according to the diagram above. We need to pay attention to connect to the correct pins on the diagram; otherwise, our code will not work properly. Our Temperature-Controlled Fan project is almost ready. All that's left is to upload the codes to our Arduino.
// Declare all the pins
int temp = A0;
int greenLed = 2;
int redLed = 4;
int fan = 7;
int buzzer = 8;
int thresholdValue = 0;
int celsius = 0;
int fahrenheit = 0;
// Functions for various work
void greenLightOn(){
digitalWrite(greenLed, HIGH);
}
void greenLightOff(){
digitalWrite(greenLed, LOW);
}
void redLightOn(){
digitalWrite(redLed, HIGH);
}
void redLightOff(){
digitalWrite(redLed, LOW);
}
void fanOn(){
digitalWrite(fan, HIGH);
}
void fanOff(){
digitalWrite(fan, LOW);
}
void buzzerOn(){
digitalWrite(buzzer, HIGH);
}
void buzzerOff(){
digitalWrite(buzzer, LOW);
}
void setup()
{
pinMode(redLed, OUTPUT);
pinMode(greenLed, OUTPUT);
pinMode(fan, OUTPUT);
pinMode(buzzer, OUTPUT);
pinMode(temp, INPUT);
Serial.begin(9600);
}
void loop(){
// Temperature calculation
celsius = map(((analogRead(A0) - 20) * 3.04), 0, 1023, -40, 125);
fahrenheit = ((celsius * 9) / 5 + 32);
Serial.print(celsius);
Serial.print(" C : ");
Serial.print(fahrenheit);
Serial.println(" F");
if( celsius<= 30){
greenLightOn();
redLightOff();
fanOff();
buzzerOff();
//Serial.println("green light on");
}
else if(celsius >= 31 && celsius <= 40){
greenLightOff();
fanOff();
buzzerOff();
redLightOn();
//Serial.println("red light on");
}
else if(celsius > 40){
redLightOn();
fanOn();
buzzerOn();
greenLightOff();
//Serial.println("Red Light On | Fan on");
}
else{
Serial.println("Temperature is Normal");
}
delay(1000);
}
Our Temperature-Controlled Fan project is ready! Stay tuned to our blog page to not miss similar content.

JST GH vs PH vs XH vs SH Connectors: Differences

Low Level vs. What is High Level Trigger?

The Code of Numbers on Drone Propellers: How to Read Propeller Measurements?
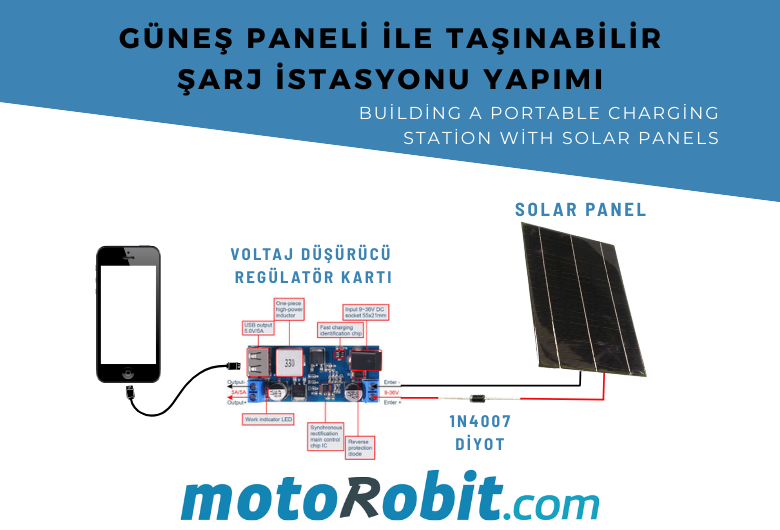
Building a Portable Charging Station with Solar Panels

Differences Between Li-ion and Li-Po Batteries: Which Battery is Suitable for Which Project?